Monday, October 31, 2016

Just for fun. Lets put an amp in it.


This was a just for fun build that has been on my list for a while.
I built a CBG amp shortly after starting this hobby. It was a simple little chip amp based on the lm386 chip. while building the amp I had the idea that it would be really easy to add this amp to a guitar. Nothing new here, it's been done before.

It takes surprisingly few components to build the amp.  

Add a battery, speaker, switch and a pot and it still doesn't amount to much. Originally the pot was going to be a volume control for the amp but then I realized I could use the volume control for the pickup instead. Since I already had a hole drilled for the pot I went ahead and used the pot to control the gain of the amp. 

I had a few 2 inch speakers in  my parts stash that will fit between the neck and the side of the box.

The required holes drilled and cut. 

I added the pickup kit from CB Gitty that I've had for a while. The speaker is wedged in the corner between the neck and a block I glued in. With the lid closed the speaker stays put.

With the amp powered up I closed the lid and got a very annoying squeal. The speaker being close to the pickup seemed to be the culprit. I tried a few things and found that by switching the leads on the speaker the squeal went away. I don't know the technical reason but it worked. 

This was all for naught, the volume with the amp was only slightly louder than playing acoustically. I ended up drilling a second sound hole and mounting two speakers to the lid beneath the sound holes. This helped a bit, it's still not what I would call loud but with the gain set to max you can get some raunchy distortion and feedback. I built this for fun and that is what it is.....


One of the reasons the amp is not as loud as I expected is there are several versions of the lm386.
The lm386n-1 which is good for about 1/3 watt output, the lm386n-3 puts out about 3/4 watt and the lm386n-4 that puts out 1 watt with an 18 volt supply.
I'm sure I used one of the lower watt versions.


Tuesday, October 25, 2016

Work holding tool

After chasing the small bits of wood around trying to cut string slots in a piece of wood for a
 nut/string guide, I remembered a tool I had seen somewhere....
I rifled through my scraps and came up with this.
Two pieces of scrap from neck builds and a clamp. I also added a nut blank bellow the clamp to act as a fulcrum. With the work clamped lightly I can square up the nut and get it positioned where I need it before clamping it tightly and getting to work.

It grips the small piece of wood and gives me something to hold onto while I cut string slots and shape the piece into something resembling a nut.  The slope on this side gives me room to get my Dremel in close.

The square side gives me a reference for depth. 

I may end up building a permanent tool, using a hinge for a fulcrum instead of fumbling with a second nut. For now using scraps and fumbling around is working.


Tuesday, October 18, 2016

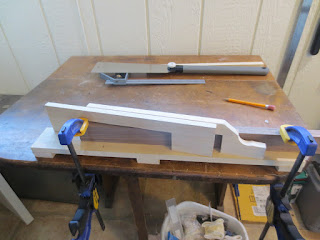
Scarf joint jig


The jig I built for cutting scarf joints isn't perfect but has greatly improved the quality of my cuts. I built this using 1/2" X 2 1/2" Poplar. When I build another jig I'll use 3/4" thick lumber.

I'm not sure what the angle of my scarf is but it takes 4" to get from one side to the other.

I marked out where the neck blank will lay on the base of the jig. 

I marked the angle of the scarf on the base, then screwed one of the upright guides to the base. I used the layout line for the scarf to position the guide. I used the saw blade as a spacer then screwed the second guide in place. I didn't have the notches for the neck blank cut yet, I used the lay out lines drawn on the base to mark where to cut the notches.

 In this pic you can see where I attached the guides with screws up through the bottom of the base. I added the feet so that the screws wouldn't interfere with clamping the jig to my bench.

One of my mods after assembly was to cut the corner off one of the guides to give me room for the saw handle. 

The blade on my saw is about 10" long but with the length of the guides I have to start my cuts with the saw handle above the guides. 

Once the cut is about half way through I change the position of the saw and finish the cut.

To keep the work from moving during the cut I clamp the neck and the jig together to my bench. 


I still have to be careful to get a perfect cut but the jig makes it much easier.


Sunday, October 2, 2016

Yet another scarf joint post

Yes it's time for an update on how I get the angle on my headstock. There are many ways to get it done, this is what works for me. The trusty and sometimes frustrating scarf joint...

To get the angle I like I measure 4 to 4 1/2" across the edge of the stock and mark my cut line.. 
That was how I did it until I built a jig to cut my scarf joints anyway.


Below you will see the jig I came up with, a base with two uprights to guide the saw. This little jig has vastly improved my cuts. I put a piece of black walnut in the jig for contrast. Before this jig I spent a lot of time fixing my freehand cuts.  

The saw in place and ready to cut. 

I switched out the Black Walnut for a piece of Maple for the rest of the demo.
The neck and head pieces are now separated (shown as they were cut) 

For glue up I take the short headstock piece and place it below the neck.

Positioned here the headstock would be 3/4" thick, I need it to be thinner.


By moving the short head piece to the right I can adjust the thickness of the headstock. The excess will be cut off after the glue is dry.

The tuners I use need the headstock to be 5/8" thick or a little less.  

When I get the thickness I want I put a witness mark across the joint and it's on to glue up. 

I apply glue to both halves of the joint. 

Knowing the joint is going to slip as soon as I put a clamp on it I start with the head piece about 1/8" to the left of my witness mark on the neck. 

As expected the two halves have slipped under clamp pressure, my witness marks are now lined up. 

After applying the rest of the clamps the joint has slipped a little more. Not to worry it is still close to 5/8"  

I like to clamp the neck to my work bench / old kitchen table to keep the head aligned with the neck.