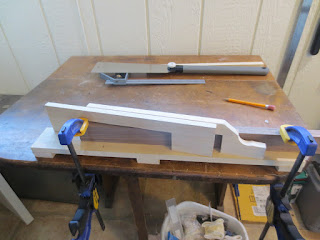
The jig I built for cutting scarf joints isn't perfect but has greatly improved the quality of my cuts. I built this using 1/2" X 2 1/2" Poplar. When I build another jig I'll use 3/4" thick lumber.
I'm not sure what the angle of my scarf is but it takes 4" to get from one side to the other.
I marked out where the neck blank will lay on the base of the jig.
I marked the angle of the scarf on the base, then screwed one of the upright guides to the base. I used the layout line for the scarf to position the guide. I used the saw blade as a spacer then screwed the second guide in place. I didn't have the notches for the neck blank cut yet, I used the lay out lines drawn on the base to mark where to cut the notches.
In this pic you can see where I attached the guides with screws up through the bottom of the base. I added the feet so that the screws wouldn't interfere with clamping the jig to my bench.
One of my mods after assembly was to cut the corner off one of the guides to give me room for the saw handle.
The blade on my saw is about 10" long but with the length of the guides I have to start my cuts with the saw handle above the guides.
Once the cut is about half way through I change the position of the saw and finish the cut.
To keep the work from moving during the cut I clamp the neck and the jig together to my bench.
I still have to be careful to get a perfect cut but the jig makes it much easier.


No comments:
Post a Comment